Create a Scorecard
Scorecard page

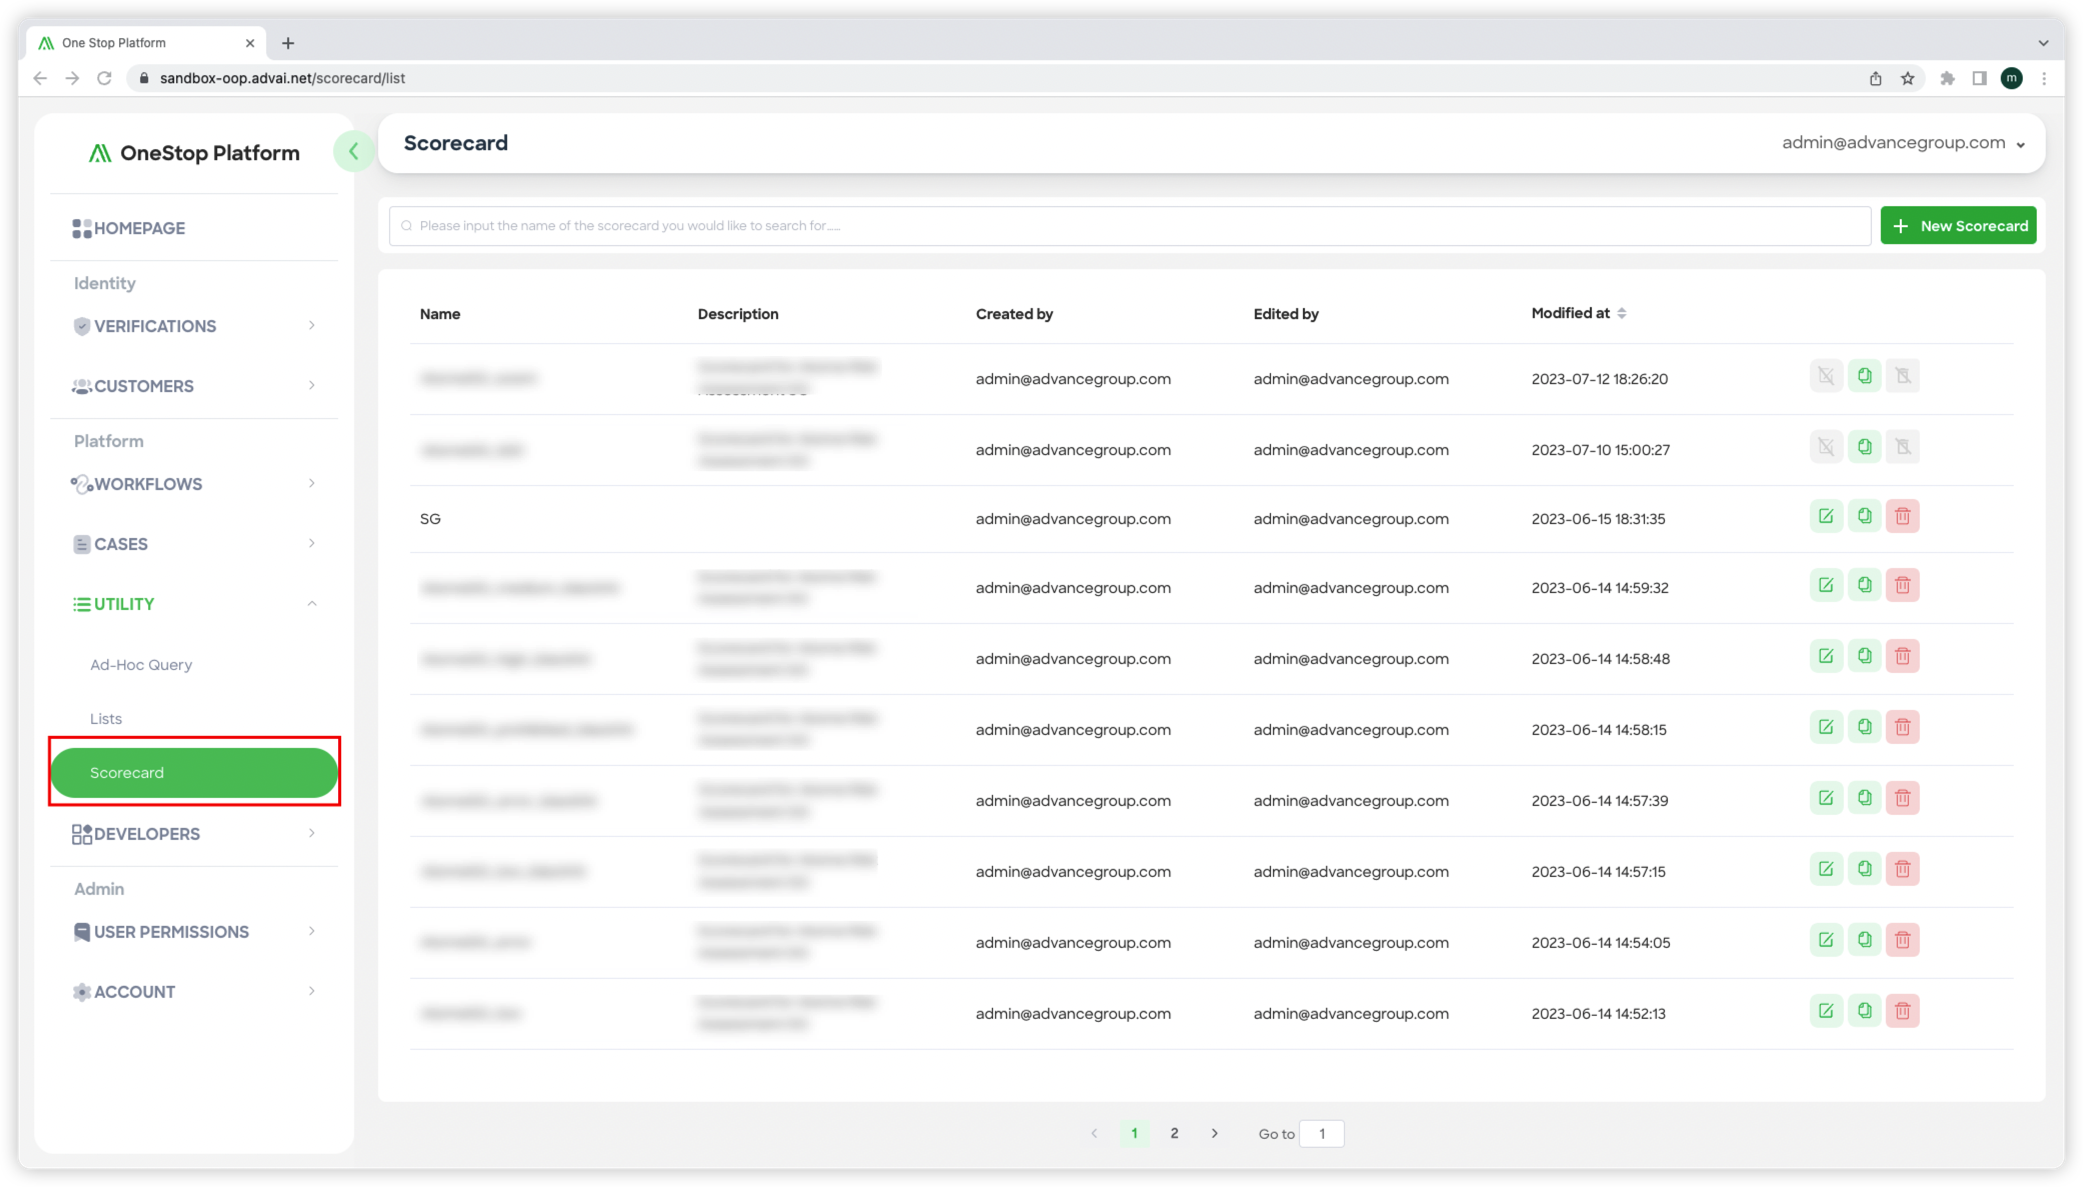
Figure 1 - Scorecard list page
Step 1: Accessing the Scorecard Page
- Navigate to the platform's menu and locate the "Scorecard" option.
- Click on the "Scorecard" option to enter the Scorecard page. Refer to "Figure 1 - Scorecard list page".
Step 2: Navigating the Scorecard Page
Upon entering the Scorecard page, you will find several key elements that facilitate efficient scorecard management. These elements include:
-
Search Bar: Utilize the search bar to easily locate specific scorecards by entering relevant keywords or criteria.
-
Scorecard List: The main section of the page displays a list of existing scorecards. Each scorecard is represented by a row, providing key information such as the scorecard name, usage in workflows ("In Workflow" column), and other relevant details.
-
New Scorecard Button: Clicking on the "New Scorecard" button allows you to create a new scorecard.
Step 3: Managing Scorecards
-
Edit: To modify an existing scorecard, locate the desired scorecard in the list and click the "Edit" button associated with it. This action will open the scorecard edit page, where you can make the necessary changes. The edit page will have a similar layout and functionality to other editing pages within the platform.
-
Delete: If you wish to remove a scorecard, locate the respective scorecard in the list and click the "Delete" button. A confirmation message will appear, ensuring that you want to proceed with the deletion.
-
Copy: To create a duplicate of a scorecard, locate the target scorecard and click the "Copy" button. This action will add a new row in the scorecard list, with the name change window popping up. By default, the input box will contain a randomly generated string appended to the original scorecard name, allowing you to modify it as needed.
Create a new scorecard

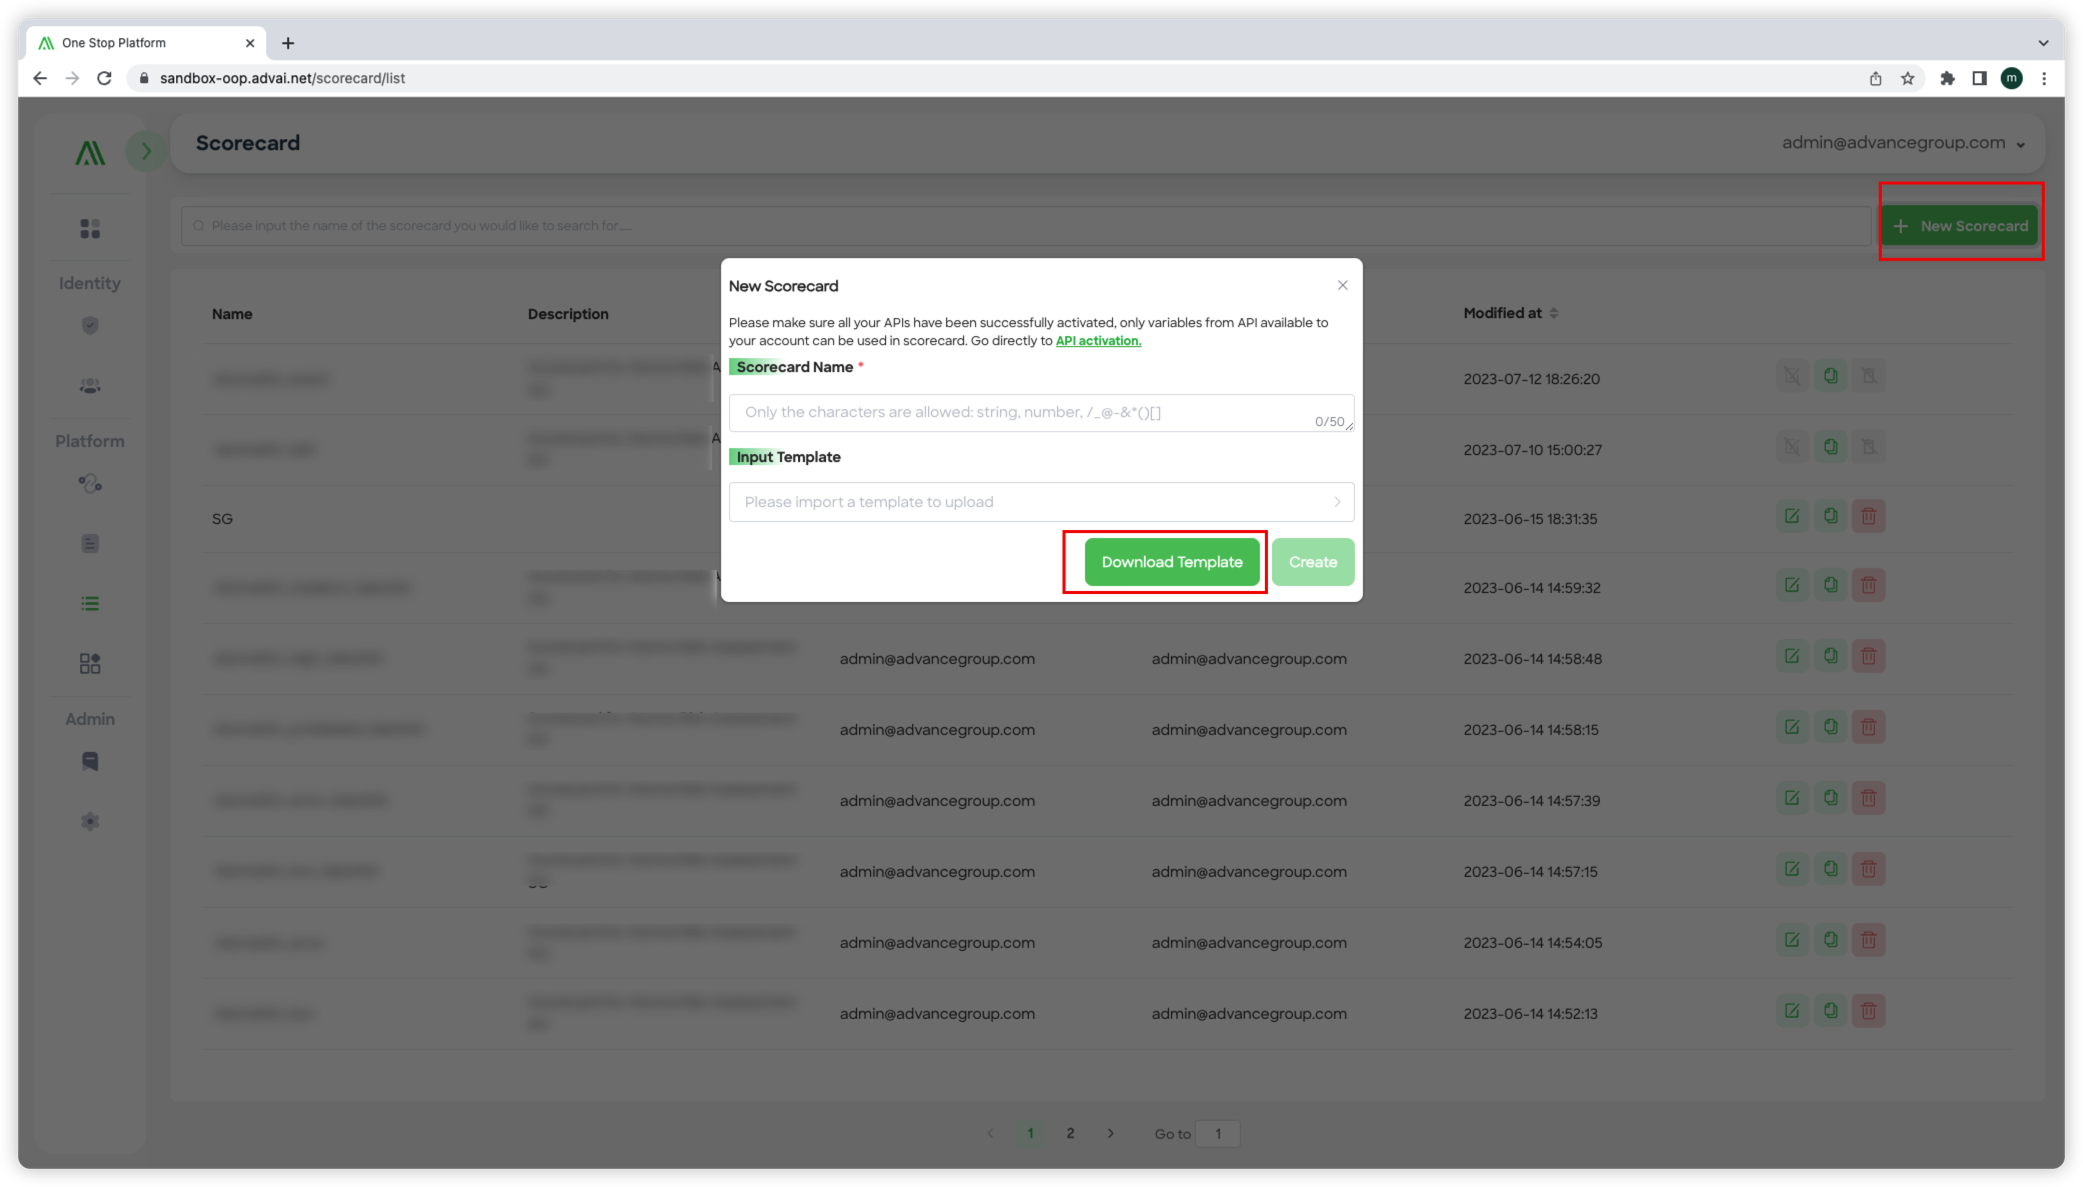
Figure 1 - Create a scorecard
Step 1: Accessing the "Create a New Scorecard"
- On the Scorecard page, click the "New Scorecard" button. This action will open a pop-up window titled "Create a New Scorecard." Refer to Figure 1 - Create a scorecard.
Step 2: Configuring the New Scorecard
- Within the "Create a New Scorecard" pop-up window, you will find the following elements:
- Prompt Message: Read the prompt message displayed at the top of the pop-up window. It reminds you to ensure that all your APIs have been successfully activated before proceeding. Only variables from activated APIs can be used in the scorecard.
- Scorecard Name Input Box: In the pop-up window, you will see an input box with the placeholder text "Scorecard Name." Enter a unique name for the scorecard in this input box.
Step 3: Utilizing the Buttons in the Pop-up Window
- The "Create a New Scorecard" pop-up window also contains several buttons to facilitate scorecard management:
- Download Template: By clicking the "Download Template" button, an Excel file will be downloaded to your local device. This template serves as a reference for creating the scorecard and includes necessary formatting. It also performs an auto-check to ensure that 'else' statements exist for each variable. If any 'else' statements are missing, the template will automatically add them when loaded onto the edit page.
- Import Scorecard: Clicking the "Import Scorecard" button allows you to upload an Excel file that follows the same format as the provided template. This feature enables you to import an existing scorecard into the platform. If you have already imported a scorecard, clicking "Open" will load the imported scorecard onto the edit page for further modifications.
- Create: When clicking the "Create" button, the action will vary depending on whether a scorecard has been imported or not:
- If a scorecard has been imported, clicking "Create" will load the imported scorecard onto the edit page, allowing you to make edits and adjustments.
- If no scorecard has been imported, clicking "Create" will open a blank scorecard edit page, providing you with a clean slate to create a new scorecard from scratch.
Step 6: Scorecard Details:

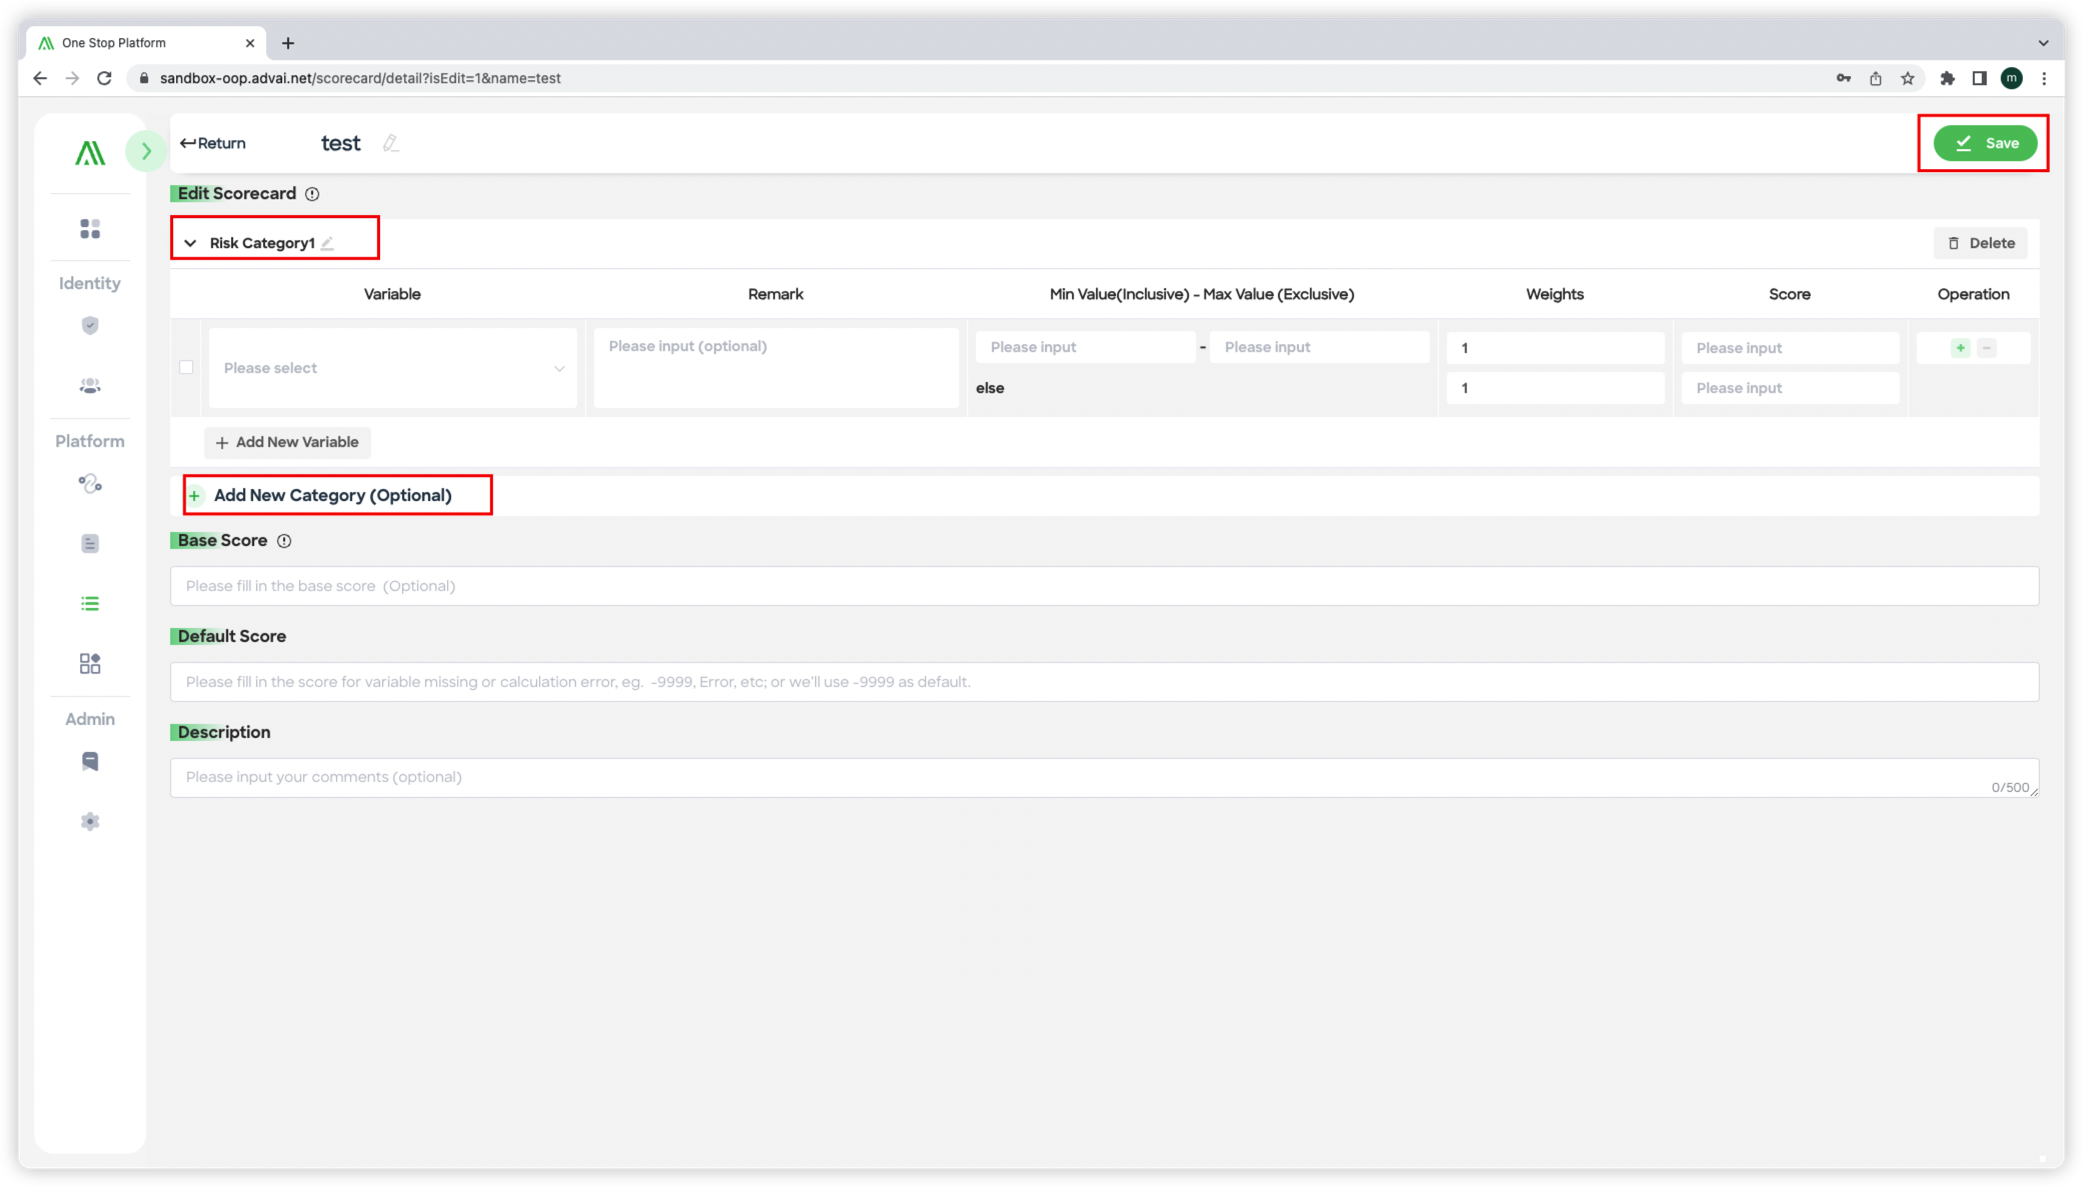
Figure 2 - Scorecard detail
- The scorecard details include information about risk categories/groups and variables. Refer to "Figure 2 - Scorecard detail"
- Risk Category/Group: By default, the scorecard has one risk category named "Risk Category 1." You can provide a custom name for the risk category or leave it as the default.
- Variables: Under each risk category, you can add new variables by clicking the "Add new variable" button.
Various settings and validation rules apply to the variables, such as minimum and maximum values, string formats, array formats, and validation checks. - The edit page also provides tooltips and information to guide you through the configuration process.
Step 7: Save the Scorecard:
- Once you have configured the scorecard, click the "Save" button to save your changes.
- A new variable with the name of the scorecard will be automatically created in the variable management section.
By following these step-by-step instructions, you can effectively configure and manage scorecards within the One Stop platform. The scorecard configuration logic ensures that you define risk categories, set up variables, apply validation rules, and save your scorecard for accurate risk assessment and management.
Tutorial
Watch these two demo video about how to create and configure a scorecard.
- Create a scorecard Demo
- Create "Category" Demo
Updated 3 months ago
